Stick-to-itiveness
By Lenny Rountree
Teachers! Name one graphomotor function we’ve all done as students? That’s it, drawing stick figures! Anyone can draw a stick figure—after all, it’s just a circle and a few lines—but with a little imagination and stick-to-itiveness it becomes a great tool to flesh out your students’ ideas and build camaraderie.
I designed an ice-breaker for my middle school classes where everyone was tasked to represent themselves as a stick figure striving toward their hopes and dreams. I organized the students’ stick figure drawings into a gallery and, after a few weeks, presented the drawings in a video, complete with thought-provoking quotes and music to inspire them. This activity can be just one step toward building familiarity among your students across grade levels and is most beneficial when it’s conducted at the start of a semester, trimester, or school year. It’s a low-risk exercise because everyone’s stick figure is just that—a stick figure. You’d be hard-pressed to find any Rembrandts or Picassos. Once weekly routines and best classroom practices have been established, you show the stick figure video to each class and—eureka—students suddenly realize that someone in another grade or class also wants to play the guitar, be great in business, or excel in a particular sport.
So, let me tell you how I went about this ice-breaker. Starting with the modeling portion of the lesson, I handed out blank sheets of paper to each of my students. At the board, I drew myself as a stick figure striving for my hopes and dreams. (Note to teachers: Drawing yourself as a stick figure will probably get a good laugh right off the bat.) After that, I wrote a caption beneath the drawing to describe the stick-figure illustration. For example, I might write “I want to play the piano better.” Next, it was the students’ turn to draw. Before students settle on what their hopes and dreams are, they will probably need some time to reflect and chat with each other first. I typically gave students the entire class period to share their ideas and complete two drawings. The first drawing pertained to their hopes for future school experiences, particularly their classroom music activities. Students made a second drawing to express a long-term interest, beyond school.
Once students finished their drawings, I collected them across four grade-levels and grouped together the drawings that had similar sentiments and aspirations. I then created the Stick Figure Hopes & Dreams video presentation with music and thought-provoking quotes. After a number of weeks, every middle school music class watched the video. Some were pleasantly surprised to learn someone else had the same or similar interests and goals. Below, click the white arrow in the center of the garden (by the yellow daffodil in the center) to watch the Stick Figure Hopes & Dreams video. Click/tap a play arrow again once the you tube appears. The music of Milton Nascimento and Brenda Russell provides a nice soundtrack.
For Music Teachers - Stick figures Step Up the Semitone Staircase
Another way I used stick figures in my class was to convey the concept of the Semitone Staircase. What’s a Semitone Staircase? It’s a drawing I developed years ago to help kids understand the chromatic scale, enharmonic tones, and the spaces or intervals between two musical tones. I thought, since most people climb steps every day, why not have kids draw a staircase and have the steps represent the 12 tones of the chromatic scale? There is a whole language of musical terms to pinpoint specific intervals, and my Semitone Staircase drawing was one of the ways to teach them those terms; like semitone, half step, whole step, minor second, major second, and so on.
The illustration below depicts the Semitone Staircase. At the start of the lesson, hand out blank sheets of paper and tell your students to position the paper in landscape orientation, just as you see in this illustration. In the top left corner, students should write their names and the date. In the bottom left corner, students should draw some horizontal and vertical lines. On the smart board, white board, or chalk board, draw one short vertical line, then connect a short horizontal line at the top. Tell students to “draw what I draw.” This is the first Semitone Staircase step. In ascension, students should replicate this until they have on their paper 13 steps rising diagonally from left to right as the illustration depicts. In essence just draw what you see here below.

Once the students have completed the above drawing, I draw the letter “C” above step #1, then “D” above step #3, “E” above step # 5, “F” above step #6, “G” above step #8, “A” above step #10, “B” above step #12, and “C” above step #13. It would be helpful to print out the illustration you see above and draw the letters on the steps as I’ve described.
All of the tones in this sequence sound the C major scale from the low sounding “C” to the high sounding “C,” an octave above. I ask students to tell me if they see any patterns in the illustration. Here is where I point out that there is not an empty step between letters “E” and “F”. The tones “E” and “F” are considered a half step or one semitone apart. Likewise, letters (or tones) “B” and “C” are a half step apart. The other sequential pairs of letters have an empty step between them and they are a whole step apart or two semitones apart. When a stick figure climbs one step, it has climbed up a half step. If it climbs two steps, that’s a whole step. So from “C” to “D,” that’s a whole step and so on.
After you have pointed out the C major scale on the staircase, you can fill in the blank steps with the enharmonic tones to show students where they appear and how they sound relative to the scale pattern. For example, on step # 2 you would draw “C#/D flat” and explain that a tone with a two-letter name is considered an enharmonic tone. Ask the students to look for patterns once every step has been filled with the enharmonic tones.
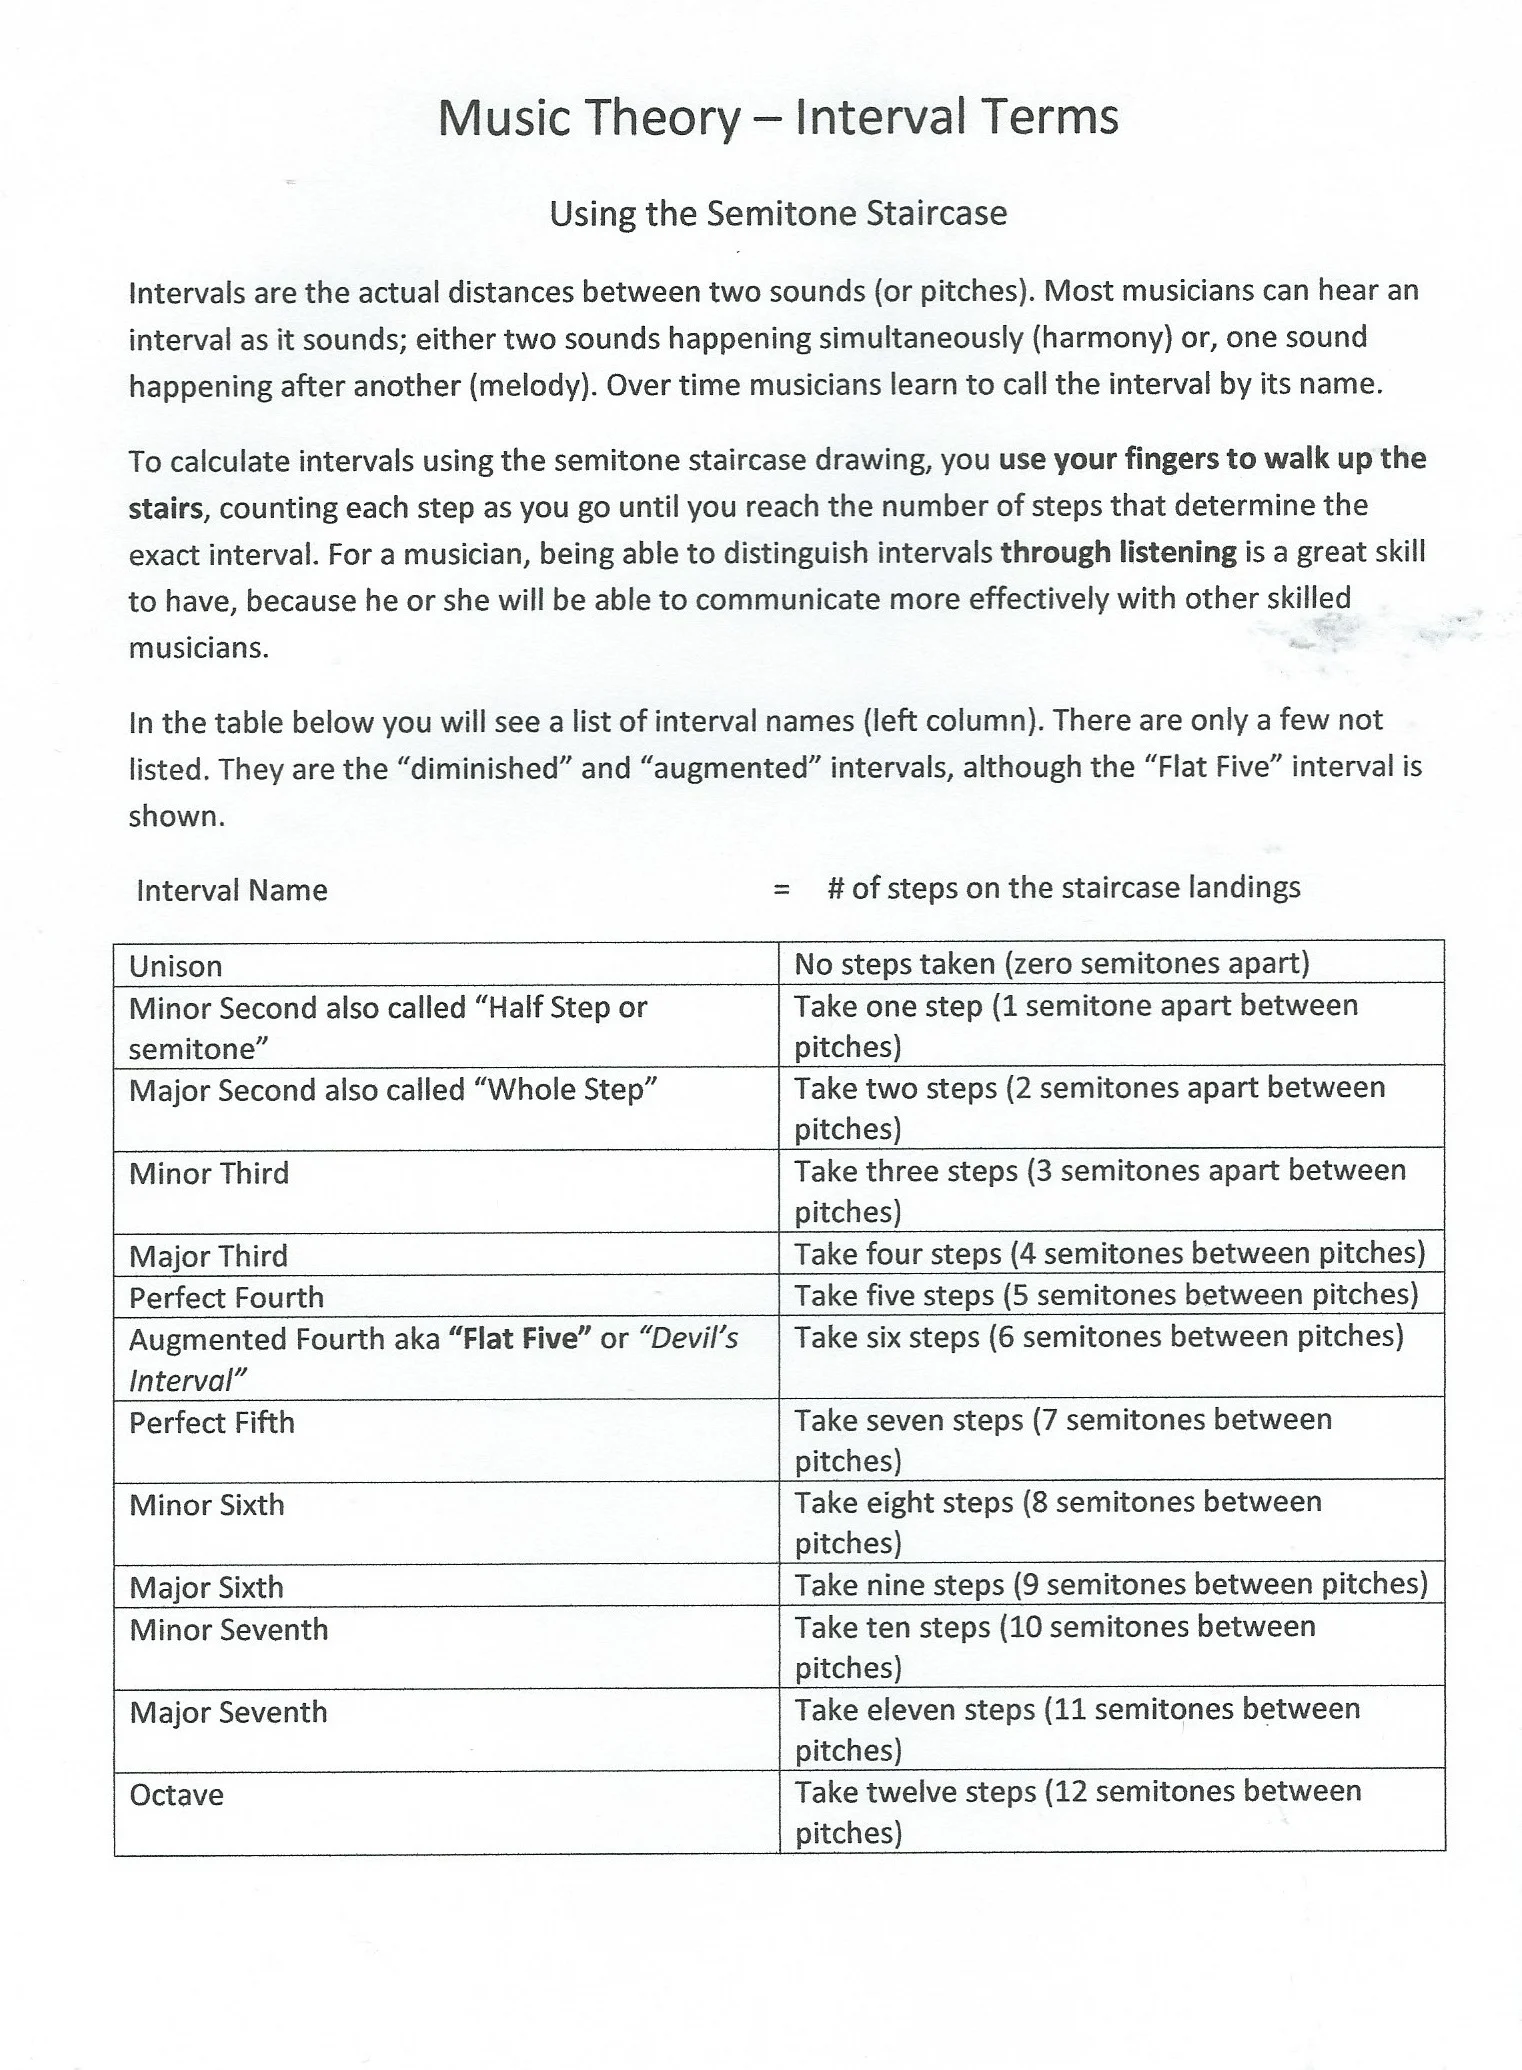
My Semitone Staircase is a good way to hone spatial perception and practice ear training, especially if you have a set of chromatic bells handy. You can get into deeper lessons like teaching the names of intervals and how many steps or semitones are between two tones. You can also show various types of scales on the Semitone Staircase. Each student can use their own drawing of the Semitone Staircase as a helpful resource throughout the year. Below is my resource to show intervals and their respective designations. This table is useful alongside the Semitone Staircase.